Manage cookies that are used for advertising, such as ad personalization, remarketing, and ad effectiveness analysis.
4.3.1.1.1. Contacts and address books in WebMail.Online
Contacts are managed in the "Contacts" section.
Contacts
A contact can only be stored in one address book. However, you can create multiple contacts with the same data in different address books.
A contact contains information about a specific address and its owner.
Create
To create a contact:
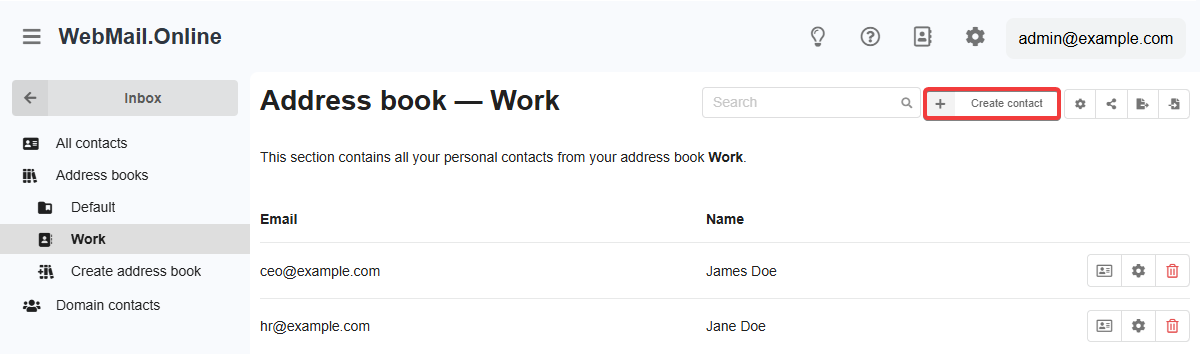
- In the "Contacts" section, click "Create contact" in the upper right corner (if a specific address book is selected in the side menu, the contact will be created directly in that address book):
- When viewing a message, click on the sender's address and then "Add" (displayed when the sender is not in your contacts).
Contact creation form:
- "Address book" — in which address book the contact will be created.
- "Personal data" — first and last name, additional fields can also be added: prefix, patronymic, maiden name, suffix, display name, nickname, organization, department, position, gender, birthday, anniversary, manager, assistant, spouse, notes.
- "Contact details" — email, you can also add additional fields: phone number, address, website.
Edit
To edit a contact:
- In the "Contacts" section, select the address book with the contact from the side menu and click ⚙️ or first 🪪 and then "Edit" in the contact row.
- When viewing a message, click on the sender's address, then "Information" (displayed when the sender is in your contacts) and "Edit".
The contact editing form is similar to the creation form.
Move between address books
To move a contact between address books, simply open it edit and select another address book in the "Address book" field.
Delete
Attention!
For security reasons, we recommend to export your contacts before deleting them.To delete a contact in the "Contacts" section of the side menu, select the address book with that contact and click 🗑 in the contact row.
Address books
All contacts are stored in address books of different types. This allows you to create personal contacts, contact groups (for example, distribute company employees' emails to address books of individual departments), as well as shared contacts that will be available to all mailboxes in the mail domain. The address books you create can be shared with other mailboxes within our services.
Address books can be used not only to organize contacts, but also to specify them as recipients when writing a message — just start typing the name of the address book in the "To" field and the system will suggest it for selection. In this case, the message will be sent to all contacts in the address book.
Types
| Default address book | Created address books | Domain contacts | |
|---|---|---|---|
| Access level | Available only in mailbox | Available in mailbox | Available in all mailboxes of the mail domain |
| Access delegation | ❌ | ✅ (only for corporate mail) | ❌ (not required within the mail domain) |
| Rename | ❌ | ✅ | ❌ |
| Delete | ❌ | ✅ | ❌ |
| CardDAV access | ✅ | ✅ | ✅ |
Create
In the "Contacts" section of the side menu, click "Create address book".
Rename and delete
In the "Contacts" section of the side menu, select the address book and click ⚙️ in the upper right corner.
Access delegation
Important points:
- Only owners of corporate mail mailboxes can delegate access.
- Mailboxes to which access is granted:
- Must be served by us.
- Can be of any type: hosting account mail or corporate mail.
- Can be associated with any mail domain (except public ones, such as Gmail, etc.).
Access delegation allows you to share your address book with another mailbox. This address book will be visible in the contacts of both the owner and users with delegated access. Additionally, you can manage the access level: read-only or read and write.
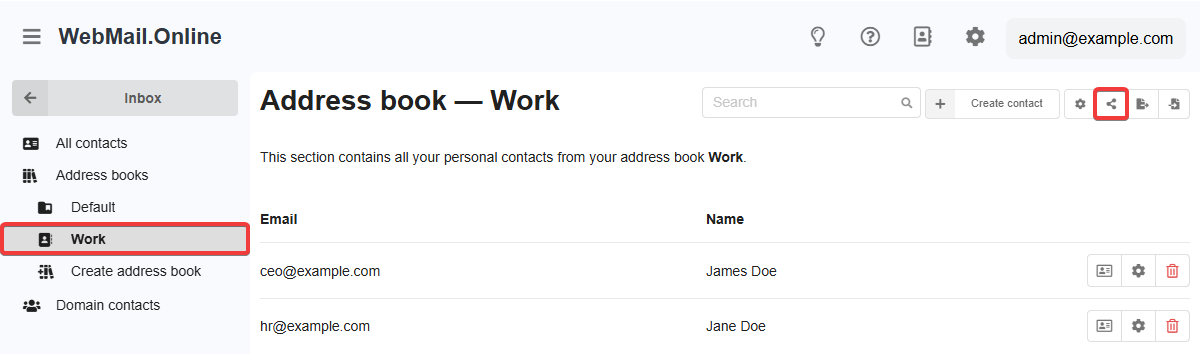
- In the "Contacts" section of the side menu, select the address book you created and click the access control button in the upper right corner:
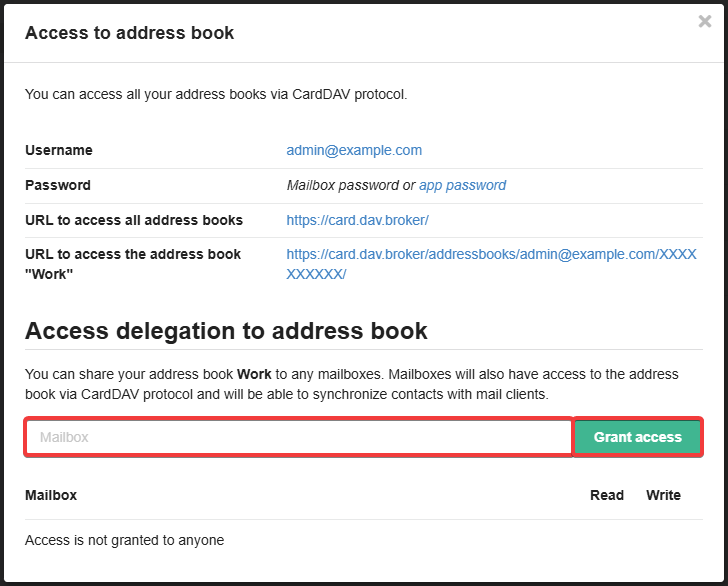
- In the access management window, enter the email address you want to grant access to and click "Grant access":
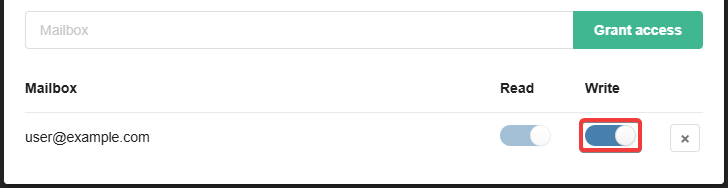
- If you need to allow changes to be made to the address book, grant write permission as well:
When access is delegated to someone, the access management button turns orange.
To close access, open the access management window and remove the addresses from the list. Users with delegated access can also revoke it themselves.