Manage cookies that are used for advertising, such as ad personalization, remarketing, and ad effectiveness analysis.
2.3.5. Sphinx
Ordering is no longer available
The Sphinx extra service is no longer available for ordering, and its support within our services has been discontinued. As an actual alternative, we recommend using Manticore Search.Payment
On shared hosting the service is paid daily from the balance, on business hosting it is included in the plan price. When ordering for shared hosting, the balance must have an amount to pay for minimum 1 month of service usage.Sphinx (SQL Phrase Index) is a full-text search system that supports morphology in various languages. It allows you to quickly and flexibly search for information in a database using arbitrary text.
Set up Sphinx
Notes:
- To check the Sphinx version, connect to the hosting via SSH and run the command
/usr/local/sphinx/bin/searchd -v. - For a detailed description of how Sphinx works and a list of all its parameters, see the official documentation.
Protocols for accessing the Sphinx search daemon (searchd):
- "MySQL-Sphinx socket" — access via SphinxQL, a type of SQL similar to MySQL.
- "Native-Sphinx socket" — access via SphinxAPI, Sphinx's own API.
To use Sphinx, you need:
- Set up Sphinx — via the control panel or manually.
Control panel
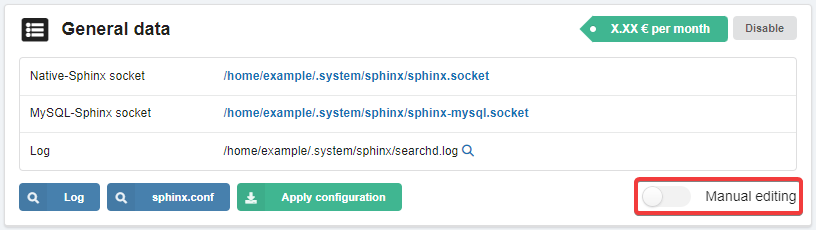
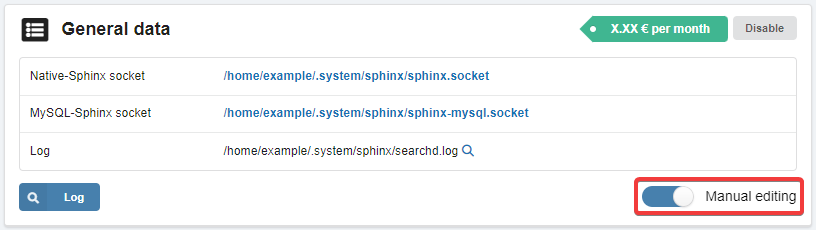
- In the "General data" section, disable "Manual editing":
- Add a data source:
- In the "Databases" section, click "Connect database":

- Specify the name and credentials for connecting to the MySQL database (you can select an existing database and the fields will be filled in automatically) and click "Save":
- Add an index:
- In the "Indexes" section, click "Create index":

- Specify the index name, select the database, specify the SQL query to get data for indexing (for example,
SELECT id, title, content FROM table— columnsid,title, andcontentfrom thetabletable), and click "Save" button:The presence of theidcolumn in the SQL query is a required condition for Sphinx. If a column with a different name is used as the ID, use an alias:SELECT custom_id as id.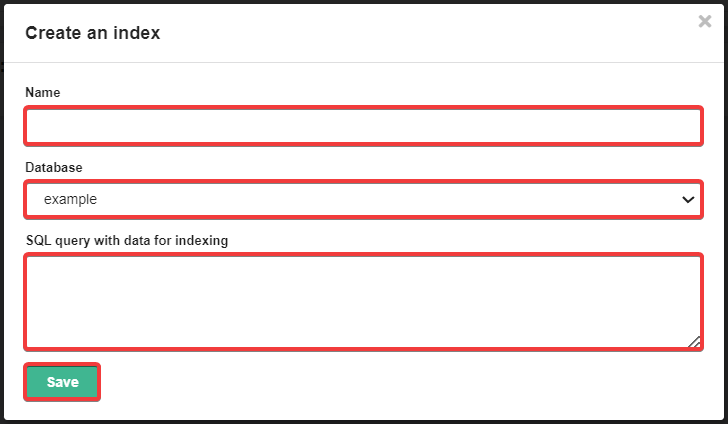
- Set up an index:
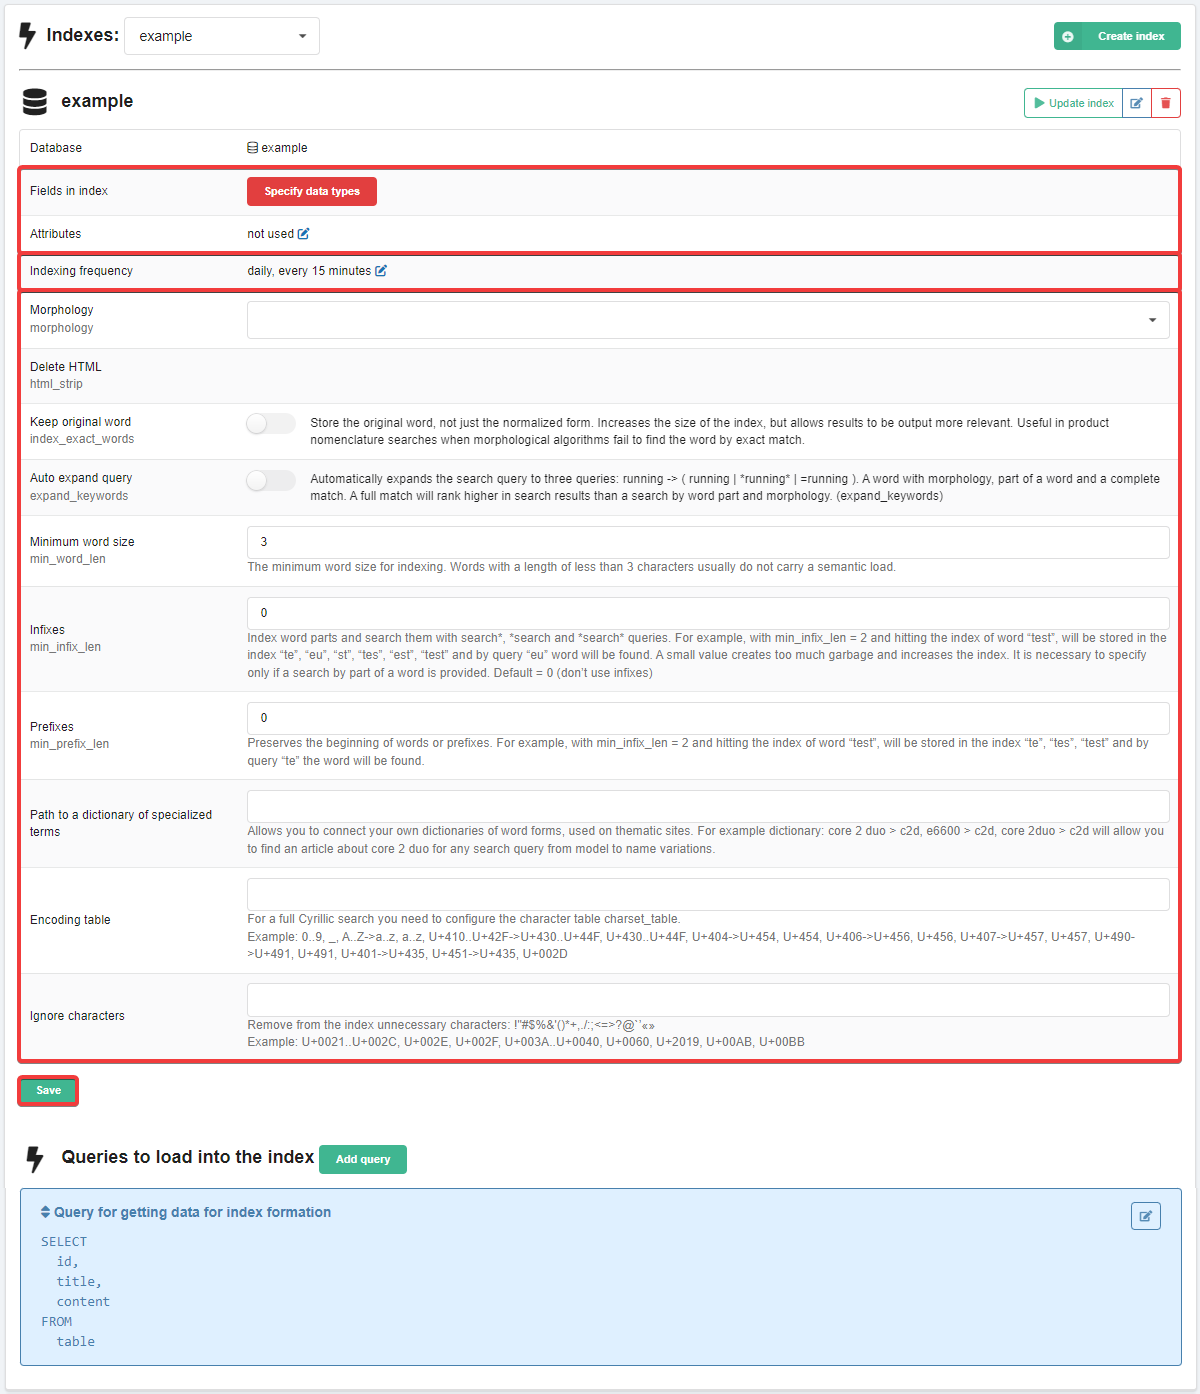
- Fields in index and attributes — list of fields and data types for each of them (at least one field must have Fulltext type):
- Indexing frequency — schedule on which indexing should be performed. It is configured similarly to the start time in cron. By default it is executed daily every 15 minutes.
- Morphology and indexing parameters:
- Morphology — name of the library (e.g.
stem_en) that will be used to search for a word with different word forms — for example, the query "create" will return results with variants "creation", "creative", "creatively", etc. - Indexing parameters — HTML stripping (
html_strip), storing original words (index_exact_words), automatic query expanding (expand_keywords), minimum word size (min_word_len), infixes (min_infix_len), prefixes (min_prefix_len), dictionary of terms (wordforms), encoding table and character ignoring.
- In the "General data" section, click "Apply configuration" to update the configuration on the server. Note Click the "sphinx.conf" button to view the contents of the generated configuration file.
Manual editing
- In the "General data" section, enable "Manual editing":
- In the "Sphinx configuration" block, specify the data sources and indexing parameters, then save your changes:
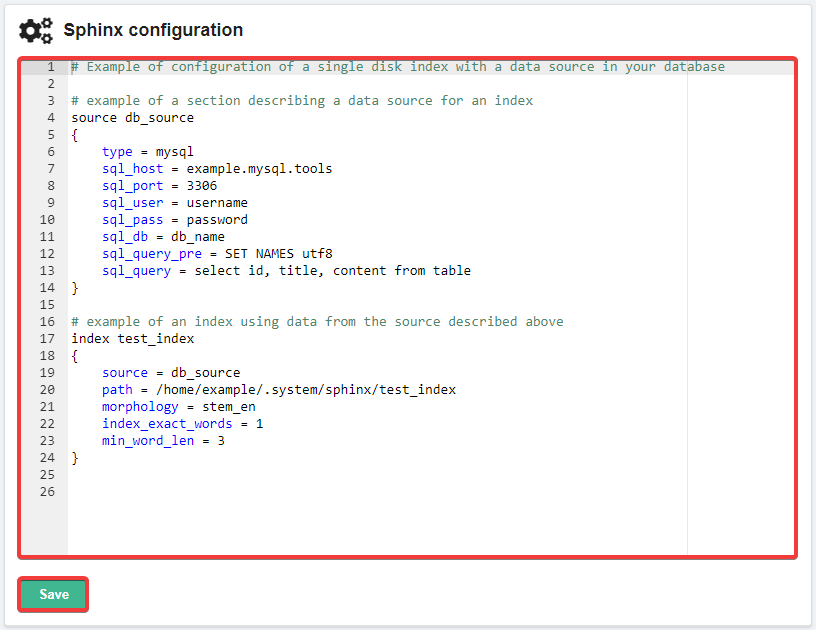
- Data source (section
source) — configuration of the data source (where Sphinx should get data from) and its name (in the example,db_source):- Data type (
type) — the type of data source (mysqlin the example). - The data for connecting to the database (
sql_host,sql_port,sql_user,sql_pass,sql_db) — the data for connecting to the MySQL database, from which the information for indexing will be taken. - Preliminary query (
sql_query_pre) — a query that will precede the main query for retrieving data from the database (in the example,SET NAMES utf8— setting UTF-8 encoding). - Main query (
sql_query) — a query to retrieve the necessary data for indexing from the database (in the example,select id, title, content from table— columnsid,title, andcontentfrom thetabletable). - Other directives — allow you to define the order of grouping, filtering, and sorting (detailed information can be found in the official documentation).
- Indexing parameters (the
indexsection) — the configuration of the index (how Sphinx should work with the data) and its name (in the example,test_index):- Data source for indexing (
source) — the name of the data source from which information will be taken for indexing (in the example,db_source— see above). - The path where the index data will be stored (
path) — the absolute path to the index file (in the example,/home/example/.system/sphinx/test_index). - Morphology settings (
morphology) — name of the library (in the example stem_en), which will be used to search for a word with different word forms — for example, the query "create" will return results with variants "creation", "creative", "creatively", etc. - Preserving words in their original form in the index (
index_exact_words) — when used in conjunction with theexpand_keywordsdirective, this allows more relevant results to be returned upon request (in the example,1— enabled). - Minimum word length for indexing (
min_word_len) — the default value is1, but words of this length usually have no semantic meaning (in the example,3). - Other directives — allow you to define the order of grouping, filtering, and sorting (detailed information can be found in the official documentation).
- Lemmatization. To enable lemmatization support, place the necessary dictionary files in your hosting account and add the following section to the configuration:
common {
    lemmatizer_base = /home/example/path/to/sphinx/dicts/
}
- After saving the configuration:
- Sphinx will be restarted.
- If there are
indexsections in the "Indexes" block in the configuration, a cron task will be created for each index to update it every 15 minutes, and index creation will be started (this may take some time):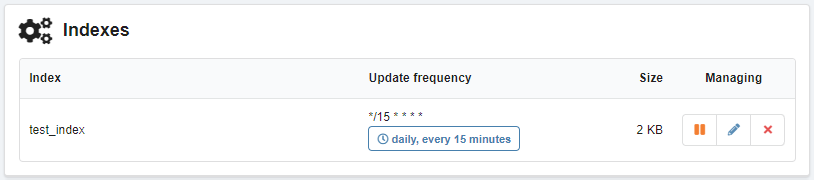
In the ''Indexes'' block:
- Size data is cached for 10 minutes.
- After clicking the delete button, the
indexsection of this index will be removed from the configuration.
Attention!
Saving changes to the Sphinx configuration does not trigger an update of previously created indexes; they will be updated automatically according to the set cron schedule. To force an update of all indexes, connect to your hosting account via SSH and run the command:/usr/local/sphinx/bin/indexer --config ~/.system/sphinx/sphinx.conf --rotate --all
Set up site
Attention!
Before using plugins to work with Sphinx, carefully read their requirements and compatibility information. Most plugins have not been supported for a long time and work with Sphinx version 2.2 or lower, while the hosting uses version 3.Setting up the site to work with Sphinx is the responsibility of the site developer or third-party specialists.
The task boils down to the following steps:
- Examine the contents of the site database and determine which data requires quick search.
- Configure Sphinx with the necessary parameters: specify which database to retrieve data from, which tables and columns to index, and set indexing rules.
- Add code to the site that will search for data in the created Sphinx index instead of the standard database search. The code can be written by a developer or independently, or ready-made plugins or modules mentioned on the official site can be used as a basis.
The site is connected to Sphinx via a socket. The path to the socket can be found on the Sphinx management page. The port should be specified depending on the configuration of the plugin being connected. In general, the port can be ignored by specifying it as 0 or 9312.
View log
There are several ways to view the log:
- Control panel: in the "Sphinx" section, in the "General data" block, click "Log" — a window will appear in which the latest log entries will be displayed in real time.
- File manager: in the "Sphinx" section in the "General data" block in the "Log" row, click 🔍 — the log will open in the built-in file manager editor.
- Console: connect to the hosting via SSH and execute the required command:
- View full log:
cat ~/.system/sphinx/searchd.log - Real-time log monitoring:
tail -f ~/.system/sphinx/searchd.logTo finish, use the shortcut Ctrl+C.
The log files
searchd.log and query.log (connection error log and query log) can be safely deleted if you do not need the information they contain.
(3)
Comments
Нужен пример граблей, на которые вы наступили. Пришлите или оставьте заполненной форму, а мы посмотрим что не так. Сам sphinx пишет лог, в котором надо искать что ему не понравилось. По мере того, как нам пишут о проблемах мы описываем ошибки и добавляем исключения. Но надо знать что не получается.
И вот наконец то дошли руки пощупать "новый" Sphinx и это какой то пиздец.
Через раз вылазят красные фреймы с "запрешено" - а почему, иди нахуй вот почему.
Захотел сделать индексирование - права на ошибку нет, если ты ошибся то ты ошибся и индекс надо создавать заново.
Сделайте ХОТЯ БЫ пояснения что не так если вылазят екшепшены. В идеальном мире вобше писать под инпутом что можно а что нельзя вводить в это поле.
И поля которые уже нельзя редактировать после создания - не нужно обманывать пользователя оставляя доступной кнопку редактирования.