Manage cookies that are used for advertising, such as ad personalization, remarketing, and ad effectiveness analysis.
2.4.2.1. Transfer site to hosting
From local device
Use this method if the site files and database are stored on your device as files or archives containing files.
- Add site to hosting.
- Important! Be sure to correct the database connection settings in the site configuration file. If the site uses absolute paths, correct them (instructions for OpenCart).
- Check the site operation at service address.
- Point the domain to the hosting.
From another hosting
Automatic transfer
Use this method if the site is hosted on a third-party server and its files are accessible via FTP or SSH, and you have direct access to the database.
- Open the section "Transfer site to us" and click "Create request".
- Select the "Automatic transfer" tab, fill out the form, and click "Create request":
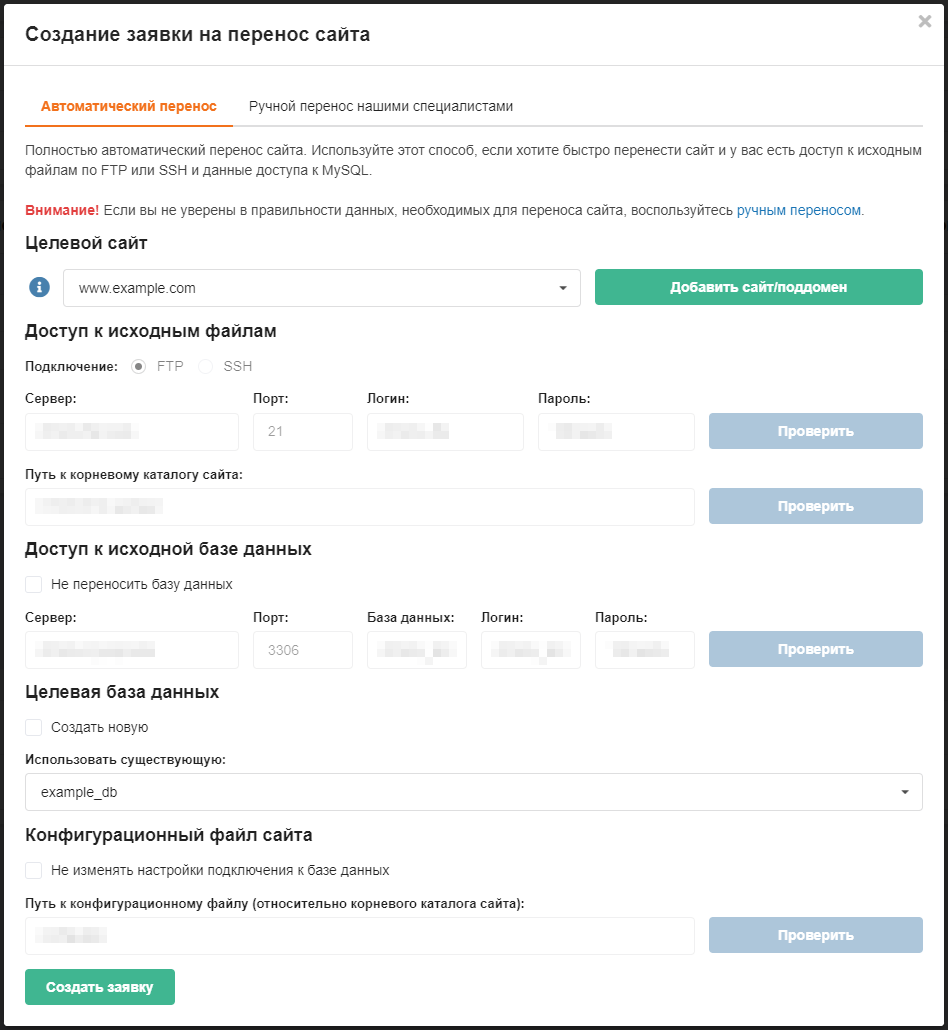
- "Target site" — a site or subdomain on the hosting service to which the files will be transferred. You can select an existing site or add a new one.
- "Files" — access data to the source site files:
- "Connection" — the method of connecting to the server.
- "Server", "Port," "Login," and "Password" — data for connecting to the server.
- "Path to the site root directory" — the path to the directory on the server whose contents you want to transfer. If not specified, all contents of the directory available by default when connecting to the server will be transferred to the hosting.
How to specify the path
For example, when you connect to the server, you are taken to the/home/exampledirectory, which contains directories for two sites —example1.comandexample2.com— whose files are stored in thewwwsubdirectories. In this case, to transfer the example1.com site, the path must be specified asexample1.com/www. If you don't specify the path — both directoriesexample1.comandexample2.comwill be transferred.
- "Access to the source database" — access data to the database of the source site:
- "Do not transfer database" — enable if you want to transfer only files without the database.
- "Server", "Port", "Database", "Login", and "Password" — data for connecting to the database.
- "Target database" — a database on the hosting service to which the contents of the source database will be transferred. You can create a new one or select an existing one.
- "Site configuration file" — when transferring a site, the system can automatically search for old database connection settings in the site configuration file and replace them with new ones:
- "Do not change database connection settings" — enable this option if you do not know the exact path to the configuration file or if you will be changing it manually.
- "Path to configuration file (relative to site root directory)" — the path to the file in the site root directory that stores the database connection settings.
- Wait for the request to be completed. You can track the status of the request in the "Transfer site to us" section.
Manual transfer by our specialists
Use this method if the site is hosted on a third-party server and you do not have access to its files via FTP or SSH, nor do you have access to the database.
- Open the section "Transfer site to us" and click "Create request".
- Select the "Manual transfer by our specialists" tab, fill out the form, and click "Create request":

- "Target site" — a site or subdomain on the hosting service to which the files will be transferred. You can select an existing site or add a new one. Use the ➕ button to add several sites to the request at once.
- "Data of the hosting provider, from which you need to transfer the site to us" — access details for the server hosting the source site:
- "Control panel URL", "Control panel login", and "Control panel password" — access data for the control panel on the server (if available).
- "Server root access data" — data for direct access to the server (if it does not have a control panel).
- "Additionally" — additional options:
- "Install free Let's Encrypt certificate" — install a free certificate.
- "Configure redirect from HTTP to HTTPS" — configure redirection to HTTPS.
- "Comment" — any information that is necessary for the transfer and will help speed up the process (important features of data access, file location, etc.).
- Wait for the request to be completed. You can track the status of the request in the "Transfer site to us" section.
(5)