Manage cookies that are used for advertising, such as ad personalization, remarketing, and ad effectiveness analysis.
2.14.1.16. Configure multisite in WordPress
A multisite can be configured both on a clean WordPress and on an already operational site. In the latter case, before configuration, it is necessary to create a backup of the site and database. In this article, the installation will be performed on a site named site.com.
On subdomains
Configure
- Enable processing of requests to nonexistent subdomains for the site.
- At the beginning of the configuration file of the site
wp-config.php, add the line:define('WP_ALLOW_MULTISITE', 'true'); - Open the admin panel of the site.
- Go to the section "Tools → Network Setup" and select the appropriate type of URL.
The network site address (URL) can be of three types:- Subdomain —
site1.site.com,site2.site.com(used by default). - Subdirectory —
site.com/site1,site.com/site2. - Separate domain —
site.com,site2.com.
- Click "Install":

- At the beginning of the configuration file of the site
wp-config.phpin the directory/home/account_name/site.com/www, add the lines that will be displayed by WordPress. In this example, it is:define('MULTISITE', true); define('SUBDOMAIN_INSTALL', true); define('DOMAIN_CURRENT_SITE', 'example.com'); define('PATH_CURRENT_SITE', '/'); define('SITE_ID_CURRENT_SITE', 1); define('BLOG_ID_CURRENT_SITE', 1); - In the file
.htaccessin the directory/home/account_name/site.com/www, replace all rules with the following:RewriteEngine On RewriteRule .* - [E=HTTP_AUTHORIZATION:%{HTTP:Authorization}] RewriteBase / RewriteRule ^index\.php$ - [L] # add a trailing slash to /wp-admin RewriteRule ^([_0-9a-zA-Z-]+/)?wp-admin$ $1wp-admin/ [R=301,L] RewriteCond %{REQUEST_FILENAME} -f [OR] RewriteCond %{REQUEST_FILENAME} -d RewriteRule ^ - [L] RewriteRule ^([_0-9a-zA-Z-]+)/?(wp-(content|admin|includes).*) $2 [L] RewriteRule ^([_0-9a-zA-Z-]+)/?(.*\.php)$ $2 [L] RewriteRule . index.php [L]
After completing these steps, your network will be activated and configured. You will need to log in to the site's admin panel again to obtain super administrator rights. In it, you will find a new option in the administrator's navigation menu called "My Sites". Network management must be carried out through this section.
Create sites
- In the admin panel of the site, open the section "My Sites → Network Admin → Sites → Add New":
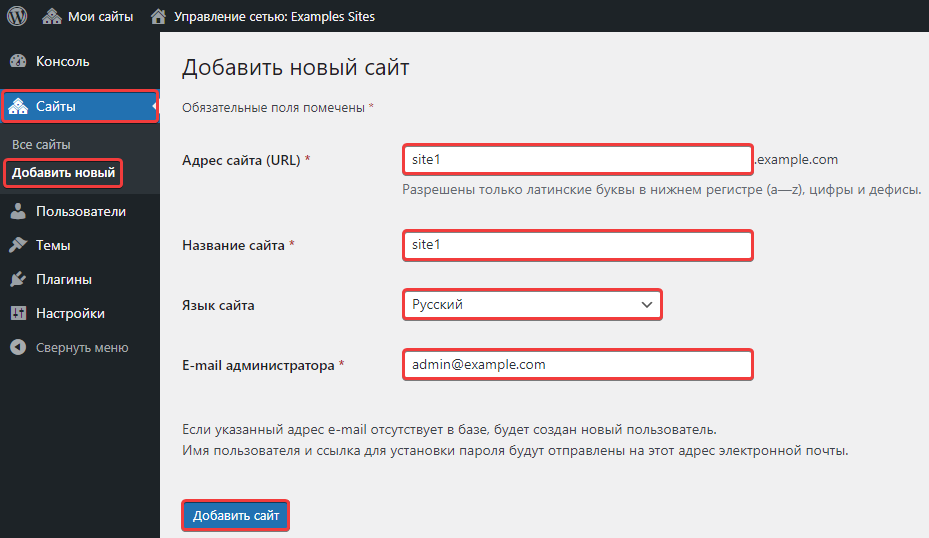
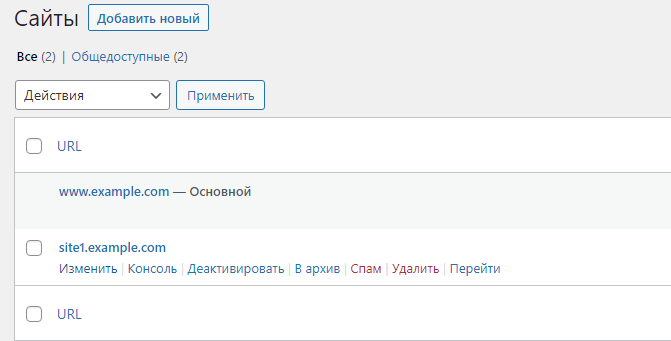
- Fill in all the fields and click "Add Site" (you can find your sites in the "Sites → All Sites" section):
Install themes and plugins
Only the super administrator of the network can install themes and plugins. Installation is carried out through the section "Network Management". In addition to installation, you will also need to activate the plugin or theme for the network: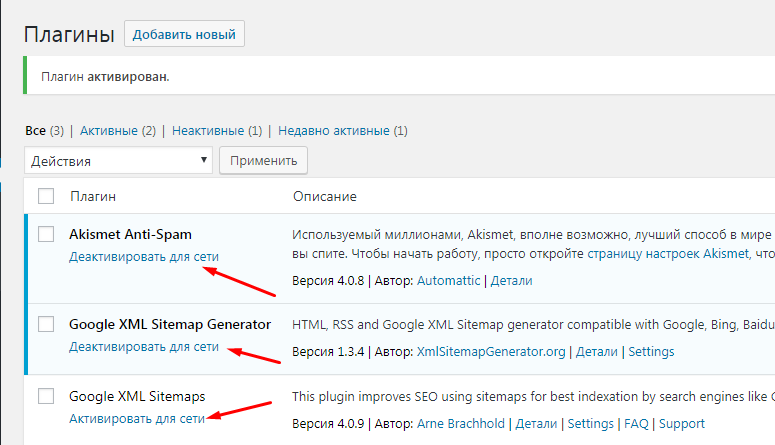
After this action, you can log in to the admin panel of the created sites and use the themes and plugins that you have enabled for the network.
On subdirectories
- To switch from subdomains to subdirectories mode, change the line in the
wp-config.phpfile:define('SUBDOMAIN_INSTALL', true);To this:
define('SUBDOMAIN_INSTALL', false); - You will also need to update the rules in the
.htaccessfile. You can access the section "Network Setup" through "My Sites → Network Admin → Settings" or via the direct linkhttp://site.com/wp-admin/network/setup.php: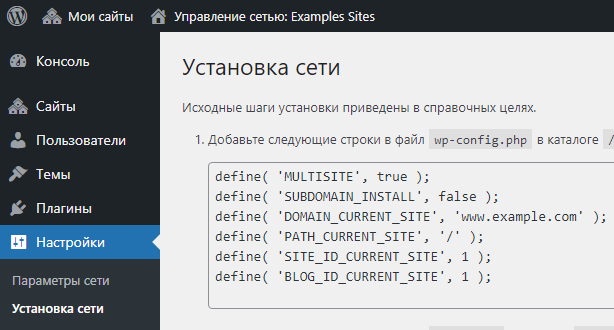
On different domains
In Wordpress versions from 4.5.x, the ability to organize a multisite on different domains appeared without the need to install additional plugins. You need to configure the multisite for subdomains or subdirectories.
- Add the necessary domains to the site's aliases.
- In the site's admin panel, in the section "My Sites → Network Admin → Sites → Add New", add a site with any name:

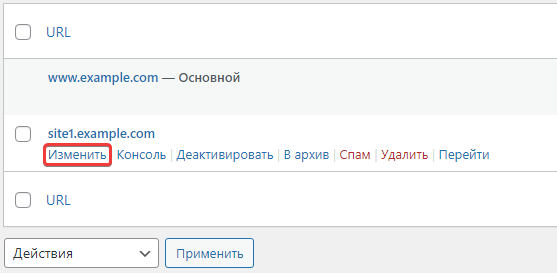
- In the section "Sites → All Sites", click "Edit" next to the created site:
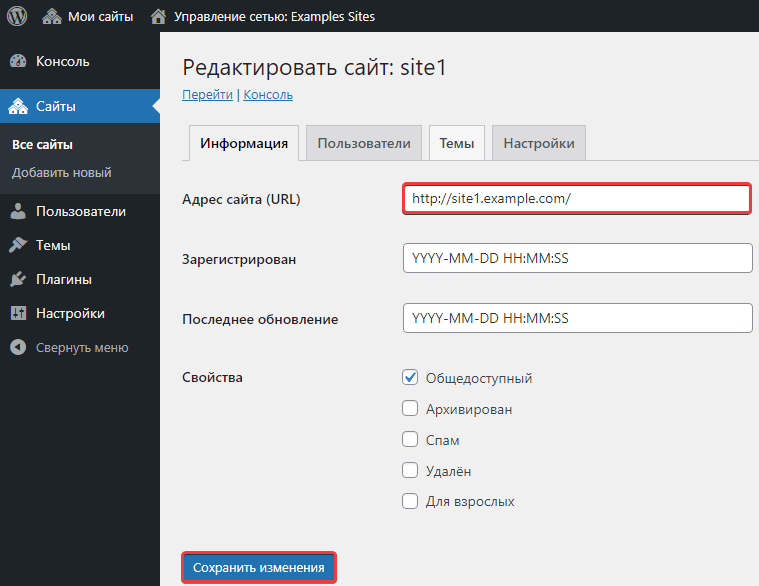
- Change the website URL in the "Information" tab to one of the domains you added to the aliases, and save the settings:
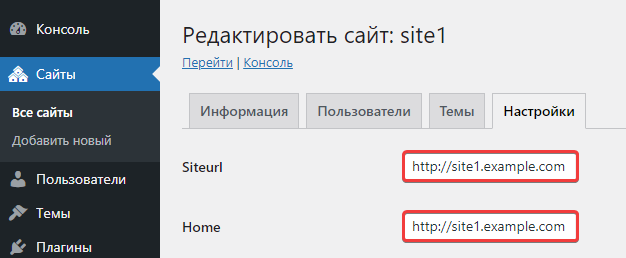
- Also change the URL in the "Settings" tab:
(1)